Your Cart is Empty
Amore Measurement Guide for Bow Drapery Rods
Measurement Guide For Bow Windows
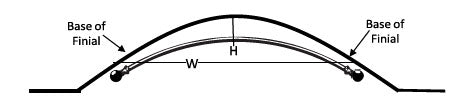
All measures are “back wall”, and we will take deductions for bracket projections to calculate the correct rod size. Please locate where you want the rod to end (not including the finials) on the wall at either end of the bow window. Then pull a tape or string tight between these two points and measure the distance. Now find the center of this distance (on the straight line), and measure the distance from this halfway point to the wall. Be sure this is measured at a right angle (90 degrees). We suggest using a note pad or business card to help, by placing one edge on the straight line width, and then following the adjoining edge to the wall.
NOTE: Curved walls usually have some imperfect curved areas. Your bow rod will be a perfect curve to your measures for best appearance. This means the rod will not exactly match the wall in all areas, but it will follow the over-all curve by averaging the variations over the width of the wall.
Required Measurements
W = Width (Straight line distance from each rod end, not including finials)
H = Height (Distance from center of W to the wall, at a right angle to W)
Suggested Additional Measurements: For rods using more than 3 brackets for support, please provide the locations where brackets will be located so seams/joints can be located at these points. This gives the best support, as we use our patented coil connector to internally splice the rods for easy installation and perfect fit. While we curve the rod in our factory in one piece, we seam the rod so that it can be more easily handled and to minimize shipping charges. Simply draw your wall and show the locations of the brackets with the distances between them, noting if the distance is on the curve or straight line (preferred).
Measurement Guide For Arch and Eyebrow Windows
Rods for arch and eyebrow windows are made to follow the curvature of the glass opening, but are mounted outside the window frame. In other words, we follow a parallel curve to the window frame. The required measures are relatively easy to obtain by following these steps:
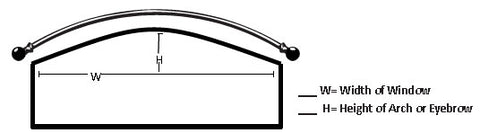
Step 1: Measure the actual window size (glass area). Only two measurements are needed for this step - the width of the window and the height of the arch or eyebrow.
It is usually easier to find the Height by taking the difference of two other measurements. Measure either A and C or B and D in order to calculate height.

- A= Distance from floor at side of window to beginning of curve.
- B= Distance from side of window at beginning of curve to ceiling.
- C= Distance from floor at center of glass window to top of arch.
- D= Distance from top of arch to ceiling.
Then use one of the following simple equations to determine height:
(H = C - A) -or- (H = B - D)
The numbers should be the same for H either way.
Step 2: In this step, you must specify where your panel or rod should be located relative to the glass measurements (W and H) provided in Step 1.
You may provide any one of the following to us, and we will make all the necessary adjustments to achieve a perfect fit:
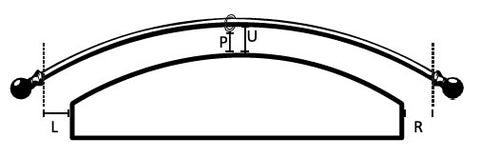
- U= Distance from the top of the arch to the underside of the rod (without rings). P= Distance from the top of the arch to the top edge of the drapery panel (for rings).
- L= Distance from the left side edge of glass to the end of rod (base of finial).
- R= Distance from the right side edge of glass to the end of rod (base of finial).
NOTE: L and R are usually the same number. If using rings, the last ring will be located approx. 1” less than the L and R, depending on the curve of the rod. The L and R distance is the straight line extension of the width, and so the rod may not come down to this location depending on the curve of the rod and the measures specified for U or P.