Your Cart is Empty
Width
Measure in a straight, level line from the point where one end of the rod will begin to the point where the other end will finish.
Measure to the base of each finial. Do not include the finials themselves in the width.

Custom Curved Drapery Hardware
Bow windows, rounded bays, and turret-style rooms have a softness that straight drapery rods cannot follow. A custom bow rod carries the curtain line gracefully around the curve, allowing the window treatment to feel like part of the architecture rather than something placed in front of it.
Measuring may look complicated at first, but the process is surprisingly simple. You are not expected to measure the curve itself. You only need to give us two straight-line measurements, and those measurements define the curve.

What We Need From You
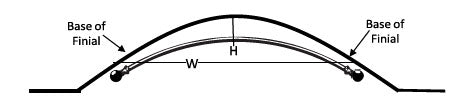
The rod curve is created from a straight width measurement and a perpendicular depth measurement. Do not run the tape along the curved wall.
Measure in a straight, level line from the point where one end of the rod will begin to the point where the other end will finish.
Measure to the base of each finial. Do not include the finials themselves in the width.
Find the exact midpoint of the width measurement. From that midpoint, measure straight back to the wall at a 90-degree angle.
This measurement tells us how deeply the rod needs to curve into the room.
Step by Step
Take your time with the endpoints and midpoint. Those three locations determine the finished curve.
Choose the exact point where the rod will begin on one side and finish on the other. These points represent the base of the finials—not the outer tips of the finials.
Allow enough space beyond the window opening for the drapery to stack when open. A common allowance is approximately 4 to 12 inches on each side, depending on the treatment, available wall space, and finial size.
Measure straight across from one endpoint to the other. Keep the tape level and pulled in a straight line.
Do not press the tape against the curved wall and do not follow the arc of the window. The straight measurement is the width, or W.
Divide the width measurement in half and mark the midpoint. This is the point from which the depth will be measured.
To double-check the center, measure from each endpoint to the midpoint. The two measurements should match.
From the center point of the width, measure straight back to the wall at a 90-degree angle. This is the height or depth, shown as H in the diagram.
A hardcover book, carpenter’s square, or another rigid object held against the wall can help keep the tape perpendicular to the width line.
Write down the measurements in inches and label them clearly:
It is helpful to include a simple sketch and photographs of the window when submitting a custom order.
Understanding the Finished Curve
A custom bow rod is formed as a smooth, true circular curve. The width and center depth determine that circle.
The rod must follow a constant radius. It cannot be made as an oval, ellipse, changing-radius curve, or irregular free-form shape.
Plaster, drywall, molding, framing, and older construction often create small variations in the wall.
The rod follows the overall curve beautifully, even though it may not touch an imperfect wall at every point.
Details That Affect the Fit
Your width measurement is the rod length from one finial base to the other. The decorative finials extend beyond that measurement.
Consider finial length when there are side walls, cabinets, trim, or other obstacles near the rod endpoints.
Clearance is the distance from the wall to the back of the rod. You do not need to provide this measurement.
It is calculated according to the bracket style and projection selected for the order.
Longer Rods and Additional Support
Some bow rods require more than three brackets or must be divided into sections for installation, handling, or shipping.
When the rod will use more than three support brackets, provide the planned bracket locations so that any rod seams can be aligned with those supports.
A simple drawing showing each bracket and the distance between brackets is usually sufficient.
Note whether each bracket-to-bracket distance was measured as a straight line or along the curve. Straight-line measurements are preferred unless instructed otherwise.
The rod may be curved in one continuous piece during production and then divided into sections afterward.
Internal connectors join the rod sections during installation. Locating those joints at bracket positions provides support and helps conceal the connection.
Preparing Your Custom Order
Clear measurements and a simple sketch help us review the planned installation before the rod is made.
Before Submitting Your Measurements
Common Questions
No. Measure the width as a straight line from one rod endpoint to the other. The depth is measured from the midpoint of that line straight back to the wall.
No. Measure from the base of one finial to the base of the other. Allow additional room beyond those points for the finials themselves.
Minor variations are common. The rod will be made as a smooth, circular curve based on the width and center depth, so it may not remain the same distance from the wall at every point.
A standard bow rod requires a constant-radius circular curve. Oval, elliptical, or changing-radius walls may require another solution and should be reviewed before ordering.
No. Rod clearance from the wall is calculated according to the selected brackets.
A large curved rod may be divided after shaping so it can be shipped, handled, and installed more easily. Internal connectors join the sections, ideally at bracket locations.
Photographs are strongly recommended. Include the full window, side walls, trim, nearby obstructions, and the planned rod location.
Contact Iron Accents before ordering. Custom curved rods are made to the measurements provided, so it is best to resolve any uncertainty before production begins.
From Measurement to Finished Rod
Once the width and center depth are established, the complicated part is finished. Those two measurements allow the rod to be shaped into a smooth arc designed for the room.
Before placing a custom order, review your dimensions carefully and contact us with any questions about the window shape, bracket placement, finials, or installation.