Your Cart is Empty


Measurement Guide for Bow Drapery Rods
How to Measure for a Bow Curtain Rod
Bow rods are designed for curved walls—like bow windows, rounded bays, and turret-style spaces—allowing your drapery to follow the natural arc of the room beautifully.
While measuring may look complicated at first glance, it’s actually quite simple once you understand the goal.
You’re not measuring the curve—you’re defining it.
Measure straight lines, and we’ll create the curve for you.
What We Need From You
To build your custom bow rod, we only need two measurements:
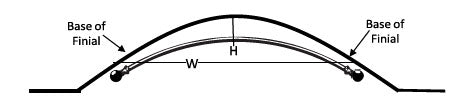
- Width (W)
- Height / Depth (H)
That’s it. We’ll take care of everything else—from calculating the curve to adjusting for brackets.
Measure straight lines. We’ll create the curve.
Required Measurements
W = Width (Straight line distance from each rod end, not including finials)
H = Height (Distance from center of W to the wall, at a right angle to W)
Start by Marking Your Rod Placement
Begin by deciding exactly where your rod will start and end. This is measured at the base of the finials, not including the finials themselves.
It’s important to allow for a bit of extra space beyond your window frame—typically 4"–12" on each side. This overhang gives your curtains room to stack properly and keeps the window feeling open and balanced.
Once you’ve chosen your placement, make small pencil marks on the wall and ensure both sides are level.
Measure the Width (W)
With your end points marked, measure straight across from one side to the other.
Keep your tape level and pull it in a straight line—do not follow the curve of the wall. This straight-line measurement is your width and forms the base of the curve we’ll create.
Find Your Center and Measure the Height (H)
Next, locate the center of your width by dividing it in half.
From that midpoint, measure straight back to the wall at a 90° angle. This measurement is your height (or depth) and determines how far the curve projects into the room.
A simple trick: hold a book or small object against the wall to help keep your tape at a true right angle.
Optional (Recommended): Finding the Center
If you’d like to double-check your measurements, you can confirm your center point by measuring from each end to the middle.
Those two measurements should match. If they don’t, simply adjust your center point slightly until they do.
This step helps ensure your rod is perfectly balanced—but you do not need to send these measurements to us.
A Few Important Notes
- All measurements are taken as straight lines, not along the curve
- Your wall does not need to be perfectly curved—we account for natural variations
- Your rod will be made as a smooth, true circular curve for the best appearance
- Bow rods must follow a constant radius (not oval or elliptical shapes)
Because of this, the finished rod may not touch the wall at every point—but it will follow the overall shape beautifully.
Clearance = distance from wall to back of rod. (No Need to Measure)
There’s nothing you need to measure here—we automatically calculate clearance based on the brackets you select, ensuring everything fits and functions properly.
Finials
Your measurements are for the rod only, not including finials.
Be sure to account for finial length when choosing your end points—especially if there are nearby walls or obstacles.
We’ll Take It From Here
Once you send your measurements, we:
- Calculate the exact curve
- Adjust for bracket projection
- Ensure a precise, custom fit
Your rod is designed to look right, function smoothly, and install with confidence.
NOTE: Curved walls usually have some imperfect curved areas. Your bow rod will be a perfect curve to your measures for best appearance. This means the rod will not exactly match the wall in all areas, but it will follow the over-all curve by averaging the variations over the width of the wall.
Suggested Additional Measurements: For rods using more than 3 brackets for support, please provide the locations where brackets will be located so seams/joints can be located at these points. This gives the best support, as we use our patented coil connector to internally splice the rods for easy installation and perfect fit. While we curve the rod in our factory in one piece, we seam the rod so that it can be more easily handled and to minimize shipping charges. Simply draw your wall and show the locations of the brackets with the distances between them, noting if the distance is on the curve or straight line (preferred).